Note that Scribl is a participant in the Amazon Associates Program, an affiliate advertising program. That means that Scribl can earn fees if you buy anything after following these links. This helps us promote all our authors' books and continue to provide free titles to our customers at our expense. If you are considering buying anything you see listed here, please consider following our link when you do.
Advanced Analysis Tool:
Using SoX to Test the MP3 Files
The easiest way to test your MP3 files is to upload them on the Audiobook page when Publishing a book through Scribl. If a file is outside the proper range, we'll tell you what's wrong. However, if you're willing to go through some extra steps, you can use a program called SoX to test these manually before uploading, saving you time and getting some additional details.
Installing SoX
SoX is available for Windows, Mac, and Linux. It will allow you to check the signal strength and noise levels of your recording to confirm they meet our requirements before submitting. It's a little tricky to install and use, so if this intimidates you, don't worry about it. You can always count on our site to tell you if anything is wrong with your files when you upload them. However, if you do want to install SoX, here are the steps to install it on Windows 10 (other versions of Windows are similar):
Do NOT run or double-click the installer, even though it ends in .EXE and looks like you should. This won't work! Instead, right-click on it and unzip the folder. If you do not see an option to unzip, then first install an unzip application like 7-zip.
Copy the whole expanded folder to a location of your choosing. I used c:\Local\DirectRun\Sox‑14.4.2, but you can put it anywhere, including inside your "My Documents" folder. Make a note of the location. If it's hard to remember or write down, you may want to copy it to the clipboard.
Right-click on the Start menu/Windows icon, select System
On the left side of the System window, click on "Advanced system settings"
Toward the bottom of the window, click on "Environment Variables…"
Under system variables, select "Path" and click on "Edit…"
In the "Edit environment variable" window that opens, click "New"
Type or paste the pathname of the location of SoX you noted above.
Click "OK," Click "OK," and Click "OK" a third time to close all of the windows. Close the System window.
Click the link to download libmad.dll (be wary that you are not clicking on an ad or other link that does not start the download of libmad.dll). If you click the correct download button, you will download a file named "__32-libmad.dll.zip"
Open the zip file and copy the included libmad.dll file into the same directory you put SoX in step 3 above. If you receive an error when using SoX to analyze your MP3 files that says, "sox FAIL util: Unable to load MAD decoder library (libmad)," this error indicates that libmad.dll has not been added to the same directory as SoX.
As a last optional step, if you plan to use SoX to perform other functions beyond just analysis (merging MP3 files, adjusting volume, compressing the audio, etc.), it can actually do much of what Audacity can do, but from the command line. This can be handy if you want to perform the same operation on several files at once. To do these, you'll also need to add a lame encoder DLL to the SoX directory. You can copy this from your Audacity install. If you used the default locations, this will be in C:\Program Files (x86)\Lame For Audacity. Copy the file lame_enc.dll to your SoX directory. Strangely, it won't work with that name. After copying it, you must also rename it to lame-enc.dll (changing the underscore to a hyphen).
You have now installed SoX and set up your system to recognize when you run it from a command prompt. Let's put it to work.
Using SoX
The following instructions assume you've installed SoX per our instructions above.
In Windows Explorer, navigate to the location one folder above the folder that holds the MP3 files you want to test with SoX.
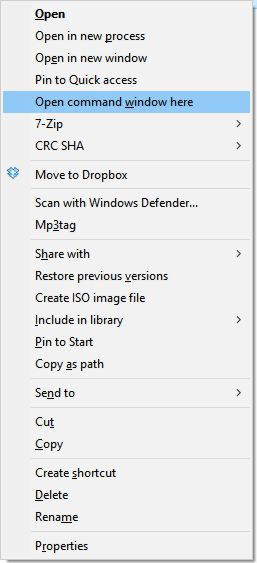
Holding down the Shift key, right-click on the folder containing the MP3 files to be tested. Select "Open command window here"
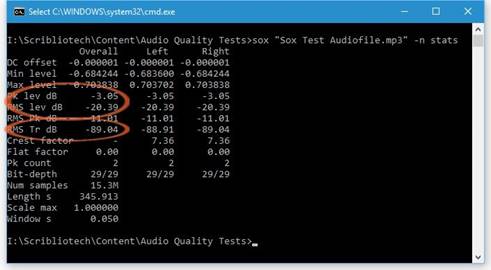
At the command prompt that opens, type the following, replacing "filename" with the name of the MP3 file you want to check (be sure to include ".mp3" as part of the filename):
The 3 main factors are the values of "Pk lev dB" (max volume), "RMS lev dB" (average volume), and "RMS Tr dB" (noise floor). To be acceptable, these must meet the following requirements:
• Pk lev dB
Less than -2.5db (-3.2 - -3.0 ideal)
• RMS lev dB
Between -23dB and -18dB (-20.0 - -18.0 ideal)
• RMS Tr dB
Less than -60dB (the lower the better, but less important than avoiding artifacts and nailing the Pk lev dB and RMS lev dB, so don't change your audio just to lower RMS Tr dB if it's already below -60dB)
If any of the values are outside the acceptable range and you did run the Compress and Normalize functions before exporting, then this could indicate too much noise in your original recording.
If you already have all of your files done from a previous distribution (such as on Podiobooks.com), and if you added the lame-enc.dll according the optional install step #14 above, then the following examples should help you update all of them to be proper for Scribl. The online documentation for SoX and a Google or Bing search can provide a lot more.
Note that each command below assumes that you are at a command prompt in the directory containing all of the MP3 files for your audiobook and that there are no other MP3 files in the directory.
To convert to dual channel joint stereo, 192kbps, normalize volume, and compress for spoken audio for Scribl's targets, this will produce new files starting with "192-normalized-":
for %x in (\*.mp3) do (sox --norm=-2.85 %x -c 2 -C 192 192-normalized-%x compand 0.3,1 6:-40,-30,-20 -5 -60 0.2)
To remove attached intro and outro that are, say, 8.25 seconds for the intro at the start and 12.5 seconds for the outro at the end, where the resulting files with start with "trimmed-" (replace the 8.25 and 12.5 with whatever amount of time you want to remove):
for %x in (\*.mp3) do (sox %x -C 192 trimmed-%x trim 8.25 reverse trim 12.5 reverse)
When you have finished processing your MP3 files you can return to review the Getting Audio Ready section, or proceed to upload your files to Scribl. Be sure your files meet the other requirements in our Audiobook File Requirements and follow the instructions on the Audiobook page of the Publish process.