Note that Scribl is a participant in the Amazon Associates Program, an affiliate advertising program. That means that Scribl can earn fees if you buy anything after following these links. This helps us promote all our authors' books and continue to provide free titles to our customers at our expense. If you are considering buying anything you see listed here, please consider following our link when you do.
Advanced Processing Option:
Chris' Dynamics Compressor
Audacity includes a built-in Compressor under Effect, which is what we recommended using under Audio File Processing with Audacity. However, depending on your particular audio files, it may not produce the best results. In many cases, an optional third-party plugin called Chris' Dynamic Compressor plugin will produce better results.
Follow the instructions on the Chris' Dynamic Compressor plugin page to install the latest version for your computer and OS. The video near the top of the page is also handy.
Note that if you are running a 64-bit version of Windows, as most modern Windows users are, the listed location for the Audacity Plug-Ins folder is wrong. Instead use C:\Program Files (x86)\Audacity\Plug-Ins.
We suggest preparing your original audio recordings differently for Chris' Dynamics Compressor. Because this compressor amplifies any noise in the near-silent parts at the very beginning and end of the recording, which can also distort the opening and ending sound, add a few words and then just sit quietly before starting each actual recording. Similarly, at the end, stay quiet for a few seconds, then say a few words. For example:
Start the recording (following the same instructions under Recording with Audacity or equivalent section for the Zoom)
Say, "These are filler words for the compressor" before the part you want to record
Stay silent for 2-3 seconds before starting the chapter or part
Read the audio that you are recording, exactly as you would do under Recording with Audacity (or equivalent section for the Zoom)
Stay silent for 2-3 seconds after finishing the chapter or part
Say, "These are filler words for the compressor"
Press Stop to end the recording, same as explained under Recording with Audacity (or equivalent section for the Zoom)
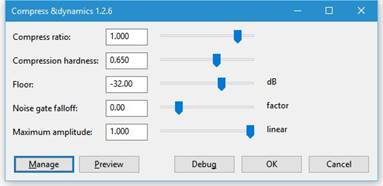
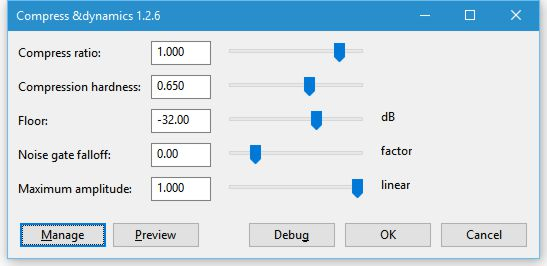
Click on Effect -> Compress Dynamics 1.2.6… (the version number you see may differ). Compression shifts your dynamic range to match the standards. Try the following values, which work well with the Normalize effect we recommend:
Lastly, when you delete the silence at the beginning and the ends of each track, be sure you are removing the filler words and the silence you added for Chris' Dynamics Compressor.
When you have finished processing your MP3 files you can return to review the Getting Audio Ready section, or proceed to upload your files to Scribl. Be sure your files meet the other requirements in our Audiobook File Requirements and follow the instructions on the Audiobook page of the Publish process.