Note that Scribl is a participant in the Amazon Associates Program, an affiliate advertising program. That means that Scribl can earn fees if you buy anything after following these links. This helps us promote all our authors' books and continue to provide free titles to our customers at our expense. If you are considering buying anything you see listed here, please consider following our link when you do.
Computer-Free with Zoom H4n and Shure SM58 mic
Even better if your computer room is loud
Total: $300 (not including 2 AA batteries or an AC adapter for the Zoom, see Optional Upgrades)
Note you could also use the same AT2005 microphone and its XLR connection with the Zoom, but we wanted to include at least one option using the legendary Shure SM58. The SM58, also a cardioid dynamic microphone, has been a concert mic used for years by many professional singers and recording artists. Maybe even your favorite artist. It also fares well for narration and is about as rugged a mic as you'll find. So if you want durability, portability, and to feel you have a connection to the pros, the SM58 is tough to beat for the price. Compared to the AT2005, it's about $20 more expensive and lacks the direct USB connection option and headphone output, but if you're connecting to the Zoom or a mixer, neither of those matters.
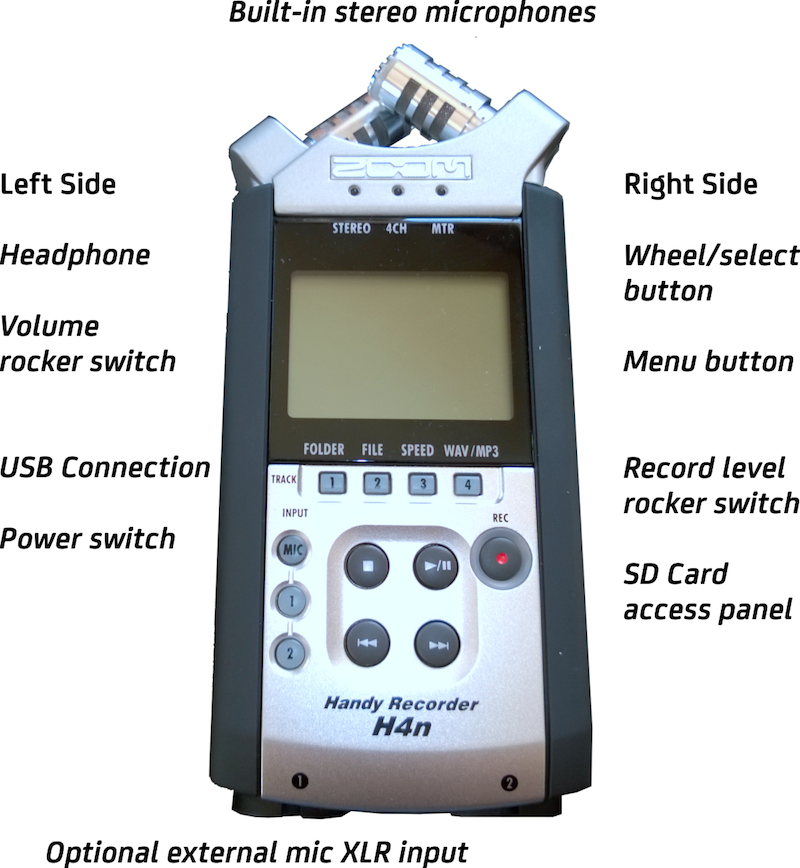
With an external mic, you will also be able to see the display of the Zoom to monitor recording levels, which you can't do when using the Zoom by itself with its built-in mics. Once you're familiar with the recording process, this doesn't matter much, but at first it can be helpful to have these visual cues.
We'll provide a complete instruction set for this configuration, but if you have the Zoom, you may want to try it both with and without an external mic. The ONLY differences between these instructions and using the Zoom H4N alone, involve putting the windscreen over the external mic instead of the built-in mics, plugging the external mic into the Zoom, and pushing the correct mic button on the front of the Zoom. Other than that, it's exactly the same process.
Install batteries. Note that the Zoom goes through batteries fairly quickly, so we recommend using rechargeable AA batteries or using the AC adapter. Find more details and links to buy these in our Optional Upgrades section.
Open the right side panel and insert the SD memory card. The SD card in the link above is a 32GB card, which should be good for about 30 hours of recording at the quality settings recommended here. WARNING: cards larger than 32GB will not work in the Zoom devices. Smaller cards will, but with proportionately reduced recording time.
To turn on the Zoom, slide the power button on the side of the unit down, toward the bottom of the unit (to power down when you're done, slide down again and hold for a few seconds).
Set the date and time the first time you use the Zoom, at daylight savings time changes, if the batteries are removed for an extended time, or if you ever notice the date or time is off. To do this, press the Menu button on the right side of the Zoom, right below the wheel (note that turning the wheel scrolls between menu items, pressing the wheel like a button selects the current menu item, pressing the Menu button again goes back to the prior level):
Press Menu
Scroll down to SYSTEM by turning the wheel, then press the wheel
Scroll to DATE/TIME (default) and press the wheel
Use the wheel to move between fields, press it once to shift the wheel so it changes the value of the selected date or time segment, then press it again to lock that value and move on to the next. Move over to OK and press the wheel button to save. Note if you press Menu here, it will not save it the change. To save, you must press the wheel button on OK.
Press Menu, and Menu again to return to the home screen
Put the Zoom into Mono mode.
Press Menu
Scroll down to INPUT and press the wheel
Scroll down to MONO MIX and press the wheel
Use the wheel to select ON, then press the wheel again
Press Menu, then Menu again to exit back to the home screen
Change the recording rate from WAV 44.1kHz and 16-bit recording depth to WAV 44.1kHz and 24-bit recording depth.
Press Menu
Scroll down to REC (short for Record) and press the wheel
Scroll to REC FORMAT (should be the default selection the first time you use the Zoom), press the wheel again
Scroll to WAV44.1kHz/24bit, press the wheel, screen should return to the REC SETTING menu showing the REC FORMAT of 44.1/24
Press Menu, and then Menu again to exit back to the home screen
Note you can also change this from the main screen by pressing the 4 shortcut button right below the screen, but we wanted you to get accustomed to using the Menu button and wheel. Aren't you glad you know both methods now?
If you are using rechargeable batteries in the Zoom (highly recommended if you're doing a lot of recording and not using the AC adapter - the Zoom eats through batteries fast), then change the setting from Alkaline to Ni-MH:
Press Menu
Scroll down to SYSTEM and press the wheel
Scroll to BATTERY and press the wheel
Select your battery type (ALKALINE or Ni-MH) and press the wheel
Press menu, and menu again to return to the home screen
Note that if you make a bunch of changes to other settings and just want to reset everything to the original settings:
Press Menu
Scroll down to SYSTEM and press the wheel
Scroll down to FAC RESET and press the wheel
Select the YES response to reset the unit
You can then repeat the above steps to get the Zoom ready to record
Pull the windscreen over the Shure SM58's head
Mount the Shure SM58 to the mic stand and position it so that you can stand or sit comfortably with your mouth less than an inch from the mic and without needing to handle the mic or stand when recording
Connect the XLR cable between the Shure SM58 and the port on the lower left of the Zoom
Press the 1 or 2 button below the MIC button on the lower left of the face of the Zoom so the 1 and 2 glow red (both will light up, even though you only have a single mic connected). This changes the recording to come through the external mic you just connected, rather than the built-in mics.
If connecting headphones under this configuration (we recommend using headphones), plug them into the headset jack on the left side of the Zoom.
When speaking, point the top of the mic toward your mouth. Don't talk to the sides of the mic.
Press the REC button (with the red dot in the middle of the button). The red ring around the button will start blinking, meaning that the recording is paused. While paused, you can see the volume meters actively monitor the recording levels and the headset will be playing back the sound the Zoom hears.
Check the volume. While paused, talk and watch the volume meters move based on the sound. The top bar is the Left and bottom bar the Right. Note the numbers below these two bars. Those are the decibel (dB) levels, ranging from -48 on the left to 0 on the right. The louder the sound, the further toward the right and toward 0dB. The goal is to get these as close to zero (bars filling all the way to the right) without actually reaching zero, which would cause clipping. Ideally, you can reach those signal levels without turning up the recording levels, because that would also amplify all the background noise. Do this by putting your mouth as close to the mics as possible when you speak without getting so close that the Zoom starts capturing excessive breath noises and pops when you say words with Ps and Bs. There should be no more than a few inches between your mouth and the mic.
Set the volume. While still paused and monitoring, this is a good time to make adjustments. Turn up or down the recording volume from the default of 80 using the REC LEVEL + and - buttons on the right side of the Zoom. That will change the volume of the recorded file. You can also turn up or down the headset volume using the VOL + and - buttons on the left side of the Zoom, also from a default of 80. The headset volume has no effect on the recording volume.
Press the Play/Pause button or the Record button while the REC light is blinking to unpause and begin recording. The red light around the REC button will stop blinking.
Press the stop button when finished recording.
If you have an SD card reader on your computer, the easiest way to get at the files is to remove the SD card from the Zoom, put it in the computer, launch/open it on your computer, and navigate to the folder STEREO\FOLDER01 (unless you changed the folder # on the Zoom). Then move or copy the files to your preferred location on your computer where you can find them with Audacity. Moving the files will free space on the card for future recordings.
If you do not have an SD card reader, or if you just prefer to transfer the files directly from Zoom to your computer by USB cable, you can do that, effectively using your Zoom as the card reader:
Connect the USB cable to your computer and the mini USB port on the left side of the Zoom
Press Menu on the right side of the Zoom
Scroll down to USB with the wheel and then press the wheel
Select STORAGE and press the wheel
At this point, you should be able to access the files stored on the Zoom as if it were a USB drive.
Navigate to the appropriate folder (STEREO\\FOLDER01 is the default folder), and move or copy the files to your preferred location on your computer where you can find them with Audacity. Moving the files will free space on the card for future recordings.