Note that Scribl is a participant in the Amazon Associates Program, an affiliate advertising program. That means that Scribl can earn fees if you buy anything after following these links. This helps us promote all our authors' books and continue to provide free titles to our customers at our expense. If you are considering buying anything you see listed here, please consider following our link when you do.
File Processing with Audacity
Whether you've recorded your file with Audacity and saved it as a project (Audacity projects end in .AUP in Windows) or are importing a WAV file from the Zoom, the steps to normalize the audio for distribution and export to MP3 are the same.
While this guide doesn't cover everything that Audacity can do, if you worked through all of the steps under Getting Everything Ready to Record with Audacity and Recording with Audacity and you complete this section, you will have gained a good working knowledge of the program. These may appear complicated, but once you're familiar with this, and if you have a modern computer, the whole process should only take about a minute per file of your time, plus maybe another minute or two (depending on the length of your chapters) exporting the file to MP3. If you have a newer computer with an SSD drive, that will noticeably speed things up.
From Audacity, select File -> Open…, or Press Ctrl-O. Browse to the file you want open, and open it as you would any other file. (You can also right click on most audio files, including AUP, MP3, and WAV, and select "Open with," then select Audacity, to open them directly from Explorer).
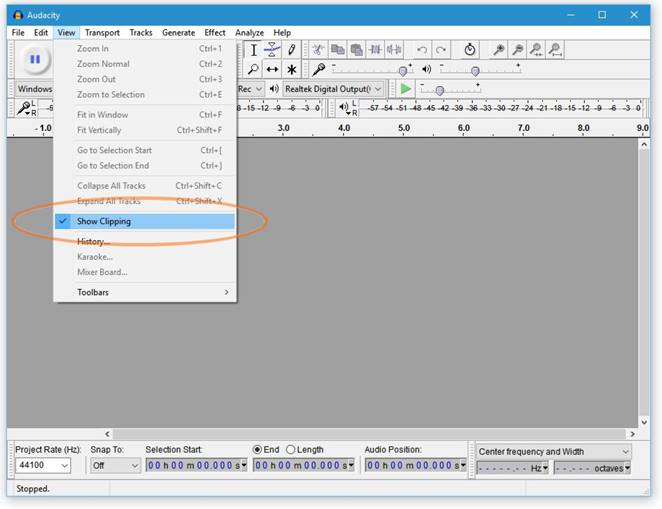
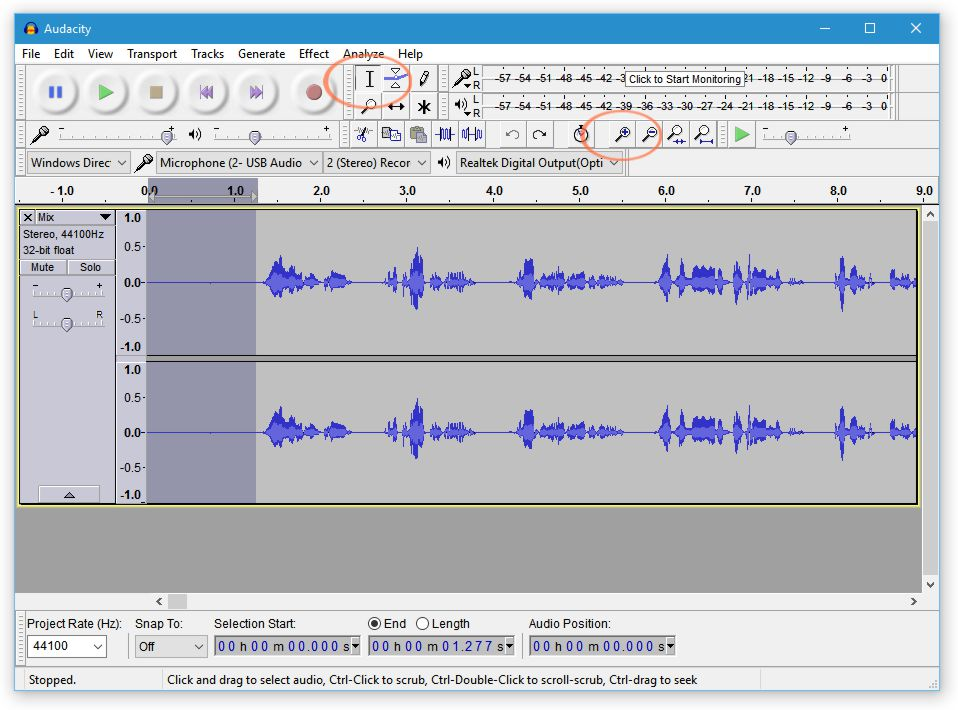
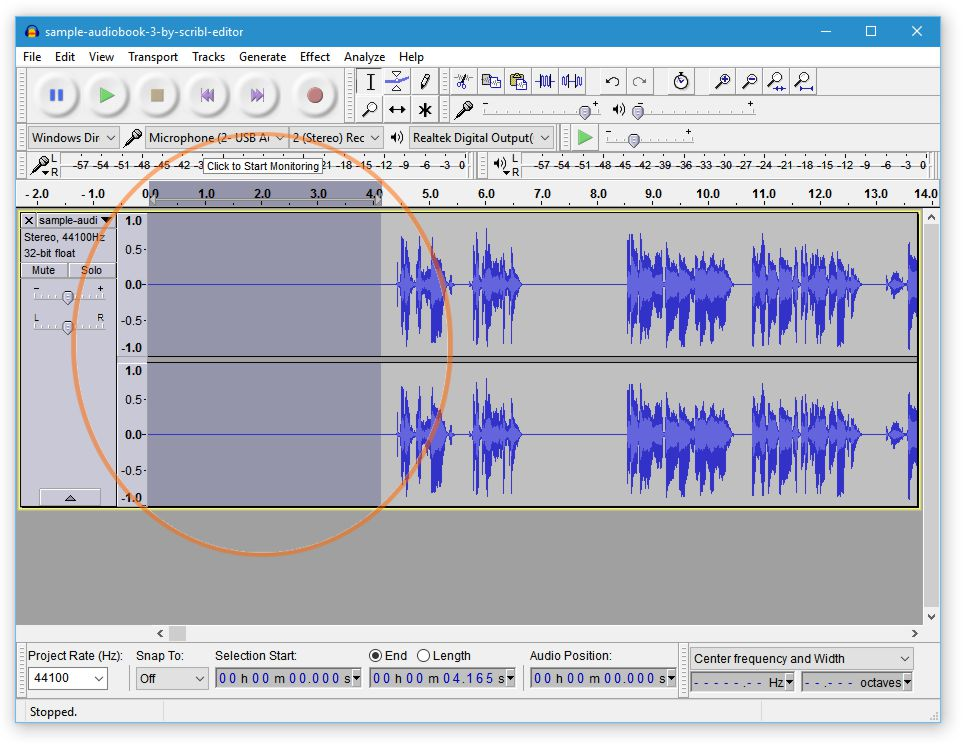
Make sure that Audacity is set to show you clipping in your audio. This is when your recording was too loud and the sound has been "clipped" to fit within the volume capacity of a digital player. Under the View menu, select "Show Clipping." Clipping occurs when you record at too high a level. In Audacity, clipping occurs every time the Recording Level meter shows the sound volume into the red all the way up to 0dB.
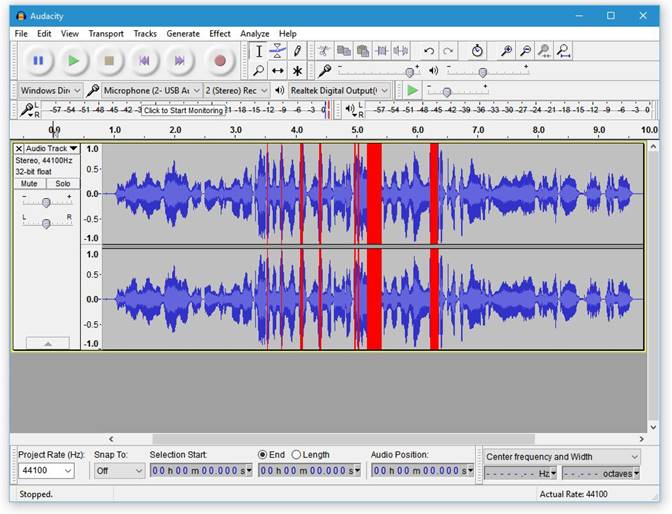
Confirm there is no clipping. There should be no red lines on your audio track. If there are single extremely narrow brief red lines, this could be OK, but if possible to re-record, that's the best way to ensure you get good results in your final file. If there are more than a few clipping lines or a thick clipping bar, as shown in the example here, you must re-record the audio.
CAUTION: NEVER OVERWRITE THE ORIGINAL FILE WHEN MAKING CHANGES. ALWAYS WORK ON A COPY.
To save the file with a new name, click on File -> Save project as…, perhaps adding a word that reminds you, like EDITS, to the beginning or end of the filename. If Audacity includes .AUP at the end (don't worry if it doesn't, just depends on your OS settings), be sure you don't remove it. It is very important that you not overwrite the original file. You'll need the original in case you ever need to go back and make different changes in the future. It is impossible to undo changes after closing Audacity.
While you can't undo any changes after you close Audacity, if you ever want to undo your latest change(s) within an open session of Audacity, you can select Edit -> Undo or press Ctrl-Z.
The three audio quality attributes that we test for when you upload a file are: Average Volume, Peak Volume, and Noise Floor. The following steps will optimize your audio quality and maximize your chances at achieving the target values for Average Volume, Peak Volume, and Noise Floor.
Please understand that the following approaches only work if your starting file has good dynamic range of at least 35db (the difference between the loud and quiet parts of the audio).
Ideally, before you perform any adjustments, your quiet areas should be below -54dB and your louder parts consistently reaching above -12dB. That would provide a dynamic range of 42dB (the difference between -54dB and -12dB), which is good. The lower the levels for the quiet parts and the higher the levels for the louder parts the better, but be careful your loud parts don't peg the meter to 0dB, because that will cause clipping. Setting the right recording levels to optimize this is covered in more detail at Setting Recording Levels in Audacity.
If your Dynamic Range is less than 35dB, then YOU MUST RE-RECORD. Before recording, be sure you have followed the setup steps at Setting Recording Levels in Audacity. If you are struggling to get past this step, contact authorsupport@scribl.com and provide as much detail as you can about what's happening for you.
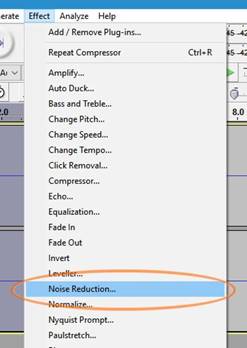
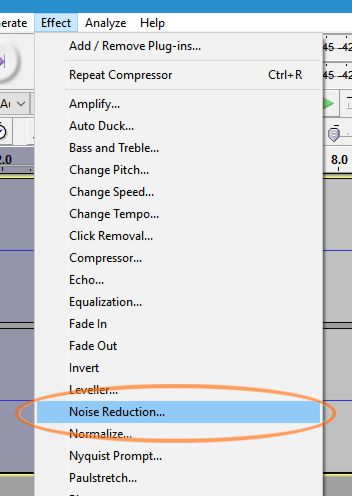
To perfect your audio, we will now perform 3 steps, which must be performed in this order: Noise Reduction, then amplitude Compression (not to be confused with file size compression), and finally Normalization.
Noise Reduction
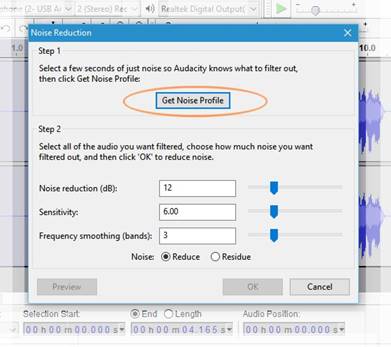
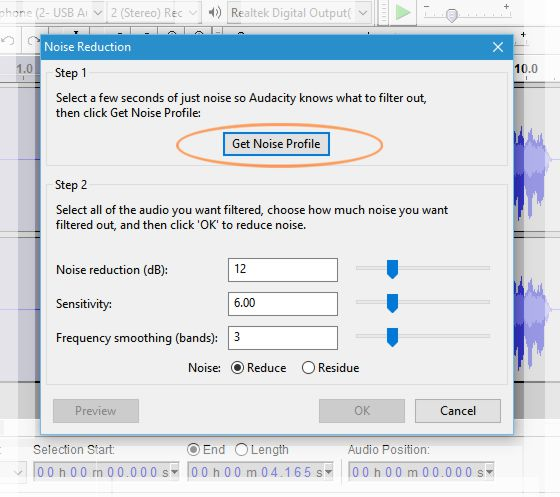
There must be about 2 seconds of quiet (no talking) recorded. This will let Audacity understand the noise we want to remove. Note that this will only work for a steady noise, like the electronic noise from your computer or amp or the sound of air coming out of a heater or air conditioner. If it's something else, like a dog barking, a jackhammer drilling or car honking outside your window, then you'll need to re-record those sections.
Check that the numbers match those in the figure below. Click "Get Noise Profile." Audacity now understands the background noise that it needs to remove from the entire file.
This time, click OK to remove the noise profile you selected earlier from the entire track
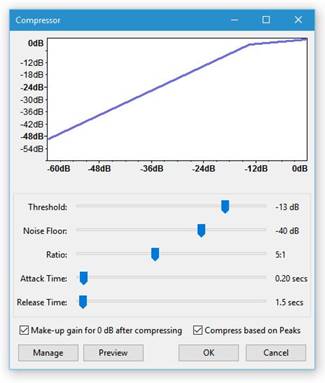
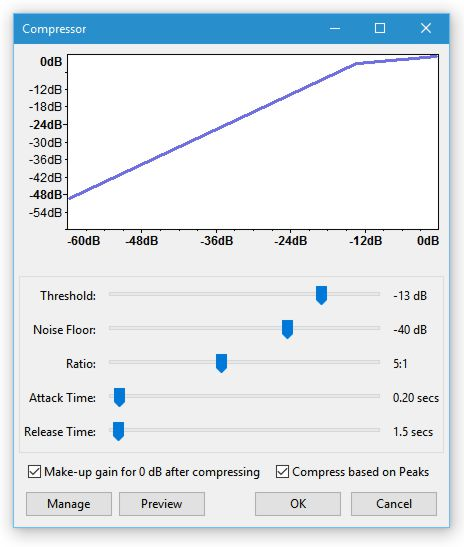
Compressor
Press Ctrl-A or click in a blank area to the left of the audio track to select the entire track. The selected region should darken, indicating it is selected.
Click on Effect -> Compressor... Change your settings if needed so the numbers on the right match the image below. Be sure both boxes at the bottom of the window are checked.
Note that there is another Compressor plugin available that often produces superior results, but it requires more work. If interested, check out Chris' Dynamics Compressor. Especially if you have a hard time getting into compliance on the volume and noise floor settings, you may find that this advanced option is your salvation.
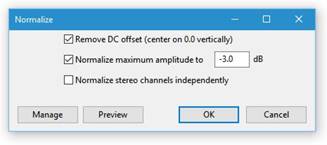
Normalize
Then, to set your audio to the right maximum volume level below the maximum Peak Volume, click on Effect -> Normalize… Use these settings to make sure the audio falls below the maximum allowable volume. If you find that your submission is rejected as having a peak volume that is too loud, then try going back to the original file and re-running, replacing the recommended "Normalize maximum amplitude to" of -3.0dB with something lower, like -3.5dB. Use the same value here for all parts of your audiobook, or the volume will noticeably change between them.
To export your file to MP3, select File -> Export Audio… Browse to the location you want to save the file. Under "Save as type:" select MP3 Files. Set the "Bit Rate Mode" to Constant, the "Quality" to 192kbps, and the "Channel Mode" to Joint Stereo. Set the file name, if you want to change it and hit Save.
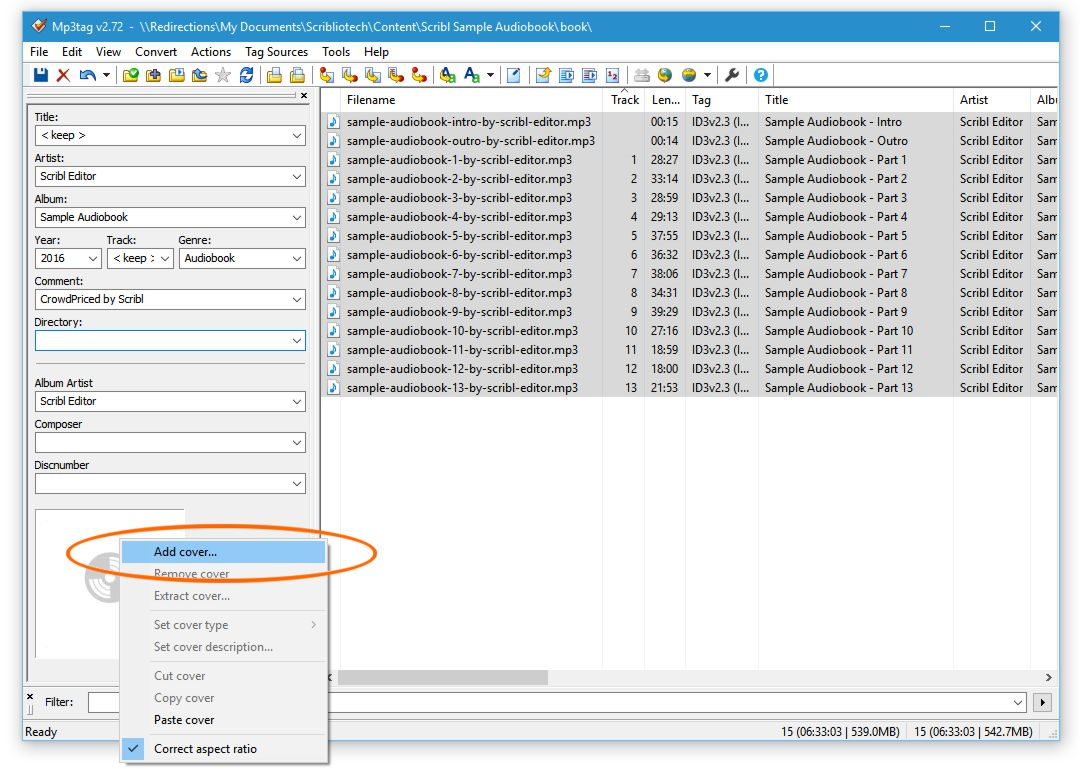
The Edit Metadata window will pop up. The only Tag here that matters is the Track Number. You must set this for each track, except for the Intro and Outro, so we know the order your files go. Even if your book is a single chapter, you must set the Track Number to 1. Keep in mind that there can be only one chapter per track, but there can be more than one track per chapter. If a chapter is longer than 78 minutes, then divide it into two or more shorter tracks. Note that you can also set the Metadata as part of the Audacity Project file before exporting to MP3, if you wish. To do this, select File -> Edit Metadata… before exporting to MP3.
At this point, you can upload your files to Scribl, but we recommend you also add a square cover image to each MP3 file (see below). In either case, be sure your files meet the other requirements for length and ID3 tagging as explained in our Audiobook File Requirements.
Scribl will convert your ebook cover to an MP3 cover for you if you don't provide one, but because a book cover is rectangular and an audiobook cover is square and much smaller, we don't recommend this. Instead, using whatever approach you used to create your ebook cover, make a square version that is readable at 300 pixels x 300 pixels. This is much smaller than the ebook cover, which is at least 1680 pixels x 2520 pixels. Because of the smaller size, you may want to remove some of the text and/or make the main words, like the title, larger. If the narrator is different from the author, you should also include the narrator's name on the cover, where you would not on the ebook.
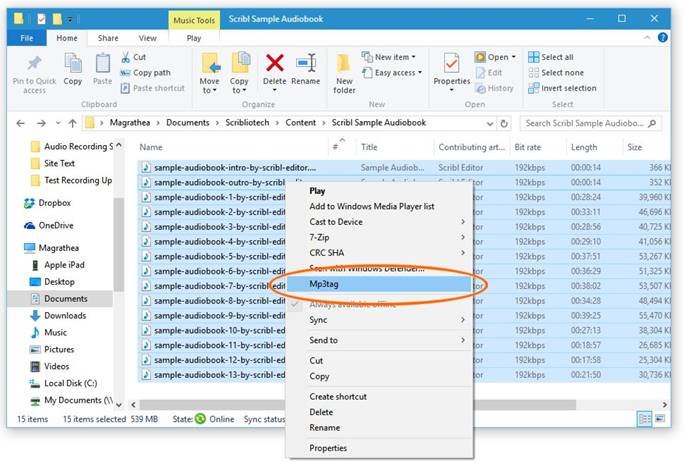
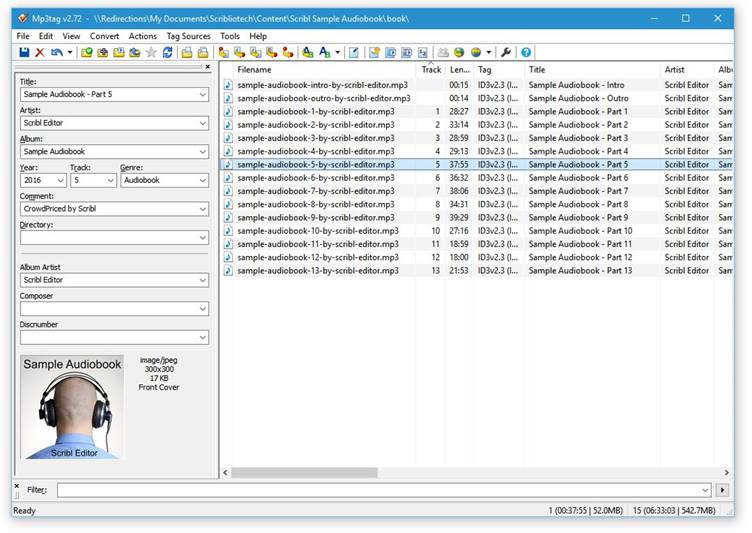
Within Mp3tag, select all of the MP3 files you just opened
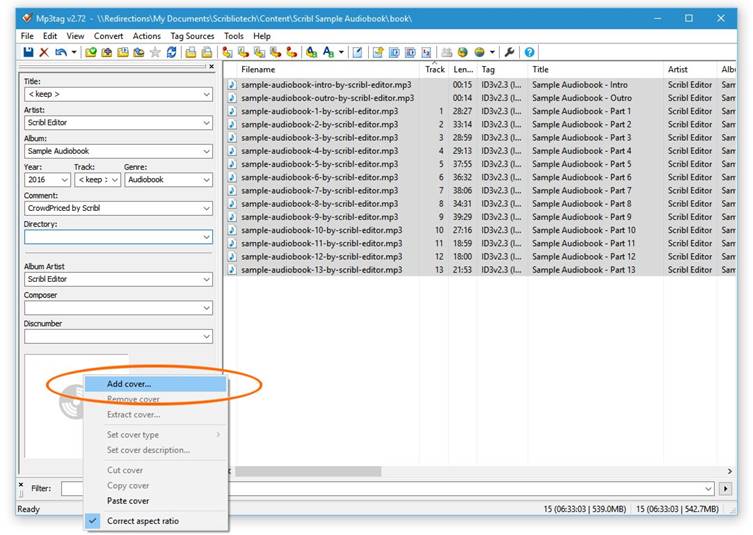
Right-click the square box with the icon of the CD in the lower left corner of the data Tag Panel on the left and select "Add Cover…" (You may need to scroll down in the Tag Panel to see it if your window doesn't show everything you see in the image below. If you don't see the Tag Panel for some reason, first enable it on the View menu or press Ctrl-Q.)
This is also a good time to be sure that the track # is correct for each file. The other fields will be overwritten by Scribl, so it doesn't really matter what values you set in other fields other than the Track # and cover image.
You are now ready to upload your files to Scribl. Be sure your files meet the other requirements in our Audiobook File Requirements and follow the instructions on the Audiobook page of the Publish process.